Tuesday, December 25, 2012

Merry Christmas


"Glory to God in the highest, and on earth peace, good will toward men."  Luke 2:14.  
Merry Christmas, everyone.  May your day and coming year be filled with joy and peace.  

Tuesday, December 18, 2012

Easy small gift box idea


Each year, my sister exchanges gifts with her five sister-in-laws for Christmas gifts.   Because they are all generally crafty people (not wily--just like to make crafts!), the gifts are often hand-made in some form. This makes exchanging gifts a bit easier, as she generally makes the same gift for each of them.  This year, she decided on making some cute beaded watches, which she found were super cheap and easy to make.  Once she finished the watches, she just needed the right wrappings.

We found some cute Christmas themed cardstock, decided on the box style/shape that we wanted (Silhouette has a seemingly endless supply of options, with all sorts of fun closures, etc.) and set our Silhouette to a-cuttin'!  Here's what we came up with!


With a little twine, some gold chalking around the edges, and a little punched tag, these perfect little gift boxes were ready to go!  We liked them.  How about you?  :)

Note:  The boxes have flaps inside that you glue to hold in place.  Just some regular stick-glue will do.  Some box shapes have cut holes to enable you to tie them closed on top (such as ours did), while others have neat twisting flower petals that link, or entwining flaps, etc.  So many fun options!  Just depends on what you like and pick.  Play around!

I think these would be fun to put small party favors in.  In fact, I think I'll do that for my very next party...

Tuesday, December 11, 2012

"Draw-Your-Own" Christmas Cards


So...when I first saw the Silhouette and Cricut sketch pens, I was excited.  Now I could have my machines draw, in a variety of colors, all these absolutely adorable images that I had?  Sounded like way too much fun.  So to test them out, I decided to make a simple Christmas card for a friend.  

First, I picked some whimsical images that I liked from my Silhouette library, and positioned them where I would like the image drawn on the paper.  This grouped snowflake image reminds me of Dr. Seuss's How the Grinch Stole Christmas for some reason, already looking hand sketched and about ready to fall onto Cindy Lou Who's little head, which had just the feel I wanted. I then made sure the image measurements were correct for the size of card I wanted (needed to fit in an envelope for mailing).  I love that Silhouette shows and tells me exactly what size my images will be.   


Although I did not plan on having both images drawn by the Sketch pens, I did want to get the correct size for both images, so I also positioned my image to cut where I would have it on the card to check sizes and design.  Once I decided that I liked it, I copied the second image and then deleted it from the page so that it, too, was not sketched by the pen. Putting in the sketch pen to replace the blade was a piece of Christmas cake--not even worth telling you just how easy it was.  After that, it was just a matter of letting the sketch pen do its magic, and to await the result.  


And the verdict is... I liked it and was surprised at how perfectly the image was drawn.  (I wanted to fill in the bottom snowflake and dot ends, so if it looks a little messy, that's why--it was me.) Now I just need to play around more with having the pens do more filled-in images, and see what more these pens are capable of! If you've used them, share some of your favorite ways to use these pens!

 Here's to some fun new crafting capabilities. :) 

 Hint:  You need to be sure that the color pen you pick will show up on the color paper that you choose for it to draw on.  You can always just test it on a corner of paper by drawing on it with the pen yourself.  Also, pay attention to the thickness of the paper. I found that my thick, slightly textured paper seemed to soak up some of the ink after it dried.

Tuesday, December 4, 2012

Frosted Vinyl Snowflakes

What do you do with frosted glass vinyl?  Lots of things. :)  But here's one option: window snowflakes!  A cute extra lil' touch just in time for Christmas.  Maybe they will encourage a bit more of the real stuff to fall from the sky for me to play in...  


This vinyl is a bit different from regular vinyl, thought it works just the same in your Silhouette.  (Can also be used in your Cricut on its vinyl settings.) It has a frosted look once adhered to glass, rather than just being a solid color, and it can last outside for up to 7 years!  Because I don't want it to encourage snowfall in July, I'm thinking I won't keep mine up that long to test it, but this could be used for some beautiful window border designs to keep up all year.  Perhaps that's what I'll try with it next, for my kitchen window.  


Well, for this project, I searched through my silhouette library for the lucky little flakes that would be making their debut on the wondrous world of front room windows, and then saw how many I could fit in one cut.  Again, have I mentioned how much I love that Silhouette gives us measurements of each of our items and where they are placed on the mat?  I love that.  


Before peeling back the excess vinyl, the sheet looks deceivingly silver, and I'll admit that I peeled back a little corner before even cutting anything, just to see if it really did look frosted.  It did. :)  

The vinyl looks silver until you pull it back and see that it really is frosted and slightly transparent.
Use your hook to pull out the intricate excess "inner" pieces
Perhaps, had I thought through my snowflake selection a little more before cutting, I would have chosen something a little less intricate and with less inner pieces to have to hook out.  But then I might have been left with something less beautiful, and less, well, intricate than what I did get.  And what are snowflakes if not incredibly beautiful, intricate, small works of wonder and art?  Random aside:  Have you ever just stared at a snowflake on your glove?  If not, next time you go outside and see "sparkly" snow (the good kind that glitters in the sun) stick your glove into it and then examine your hand closely.  You'll see beautiful, intricate snowflakes that look surprisingly just like the kind we draw as kids!  (Or cut out of Silhouettes and put on windows...)


My roommate confessed, after I put up the snowflakes on the front window, that when she first heard what I was doing she thought it sounded like those cheap and (forgive me) tacky window stickers that people sometimes put up for the holidays.  But THESE, she said, were actually really nice and classy.  After seeing them, she wanted more!  :)  So I guess that's a win. One-point, frosted glass vinyl.   (I wonder if that means I can use this to make frosted glass-ghosts to put up next Halloween? :))


Tuesday, November 27, 2012

Learning: Foil and Printed Envelope Stickers


So this little "DIY" was a learning project for me.  I wanted to use our printable silver adhesive foil to make Christmas envelope stickers seals for my Christmas cards, and I thought it would be easy.  Turns out that it is easy, but only after I learned a few valuable lessons. Be sure you read on to find out what I did wrong, so that you don't make the same simple mistakes.

To start, I had never played around with making my own "print and cut" image before. After looking for some images in the silhouette store, I decided that I wanted something that would let a little more of the silver show through, since that's the color I wanted in the first place.  I created my own design, a Christmas wreath with the word "joy" inside, and then deleted all the cut-marks.  Then, I took the circular cut-marks from a set of seals that I had found in my silhouette library and was also going to use, by doing a bit of "un-grouping" and copying of pieces of the image.   Turns out, all of that was the easy stuff.  It was good to play around with and try out.

Where the troubles came in was when I actually went to print on the foil.  I first tested my images on a regular sheet of paper to be sure that it would print my created image in the colors I had chosen. (Again,  it was my first time, so I wanted to be sure I did it correctly.)  I was pleased with the outcome, and was feeling pretty good about my own quickness at learning the ropes, when I sent my job through to print onto the foil paper.  Turns out I should have read the directions a little more carefully.  When Silhouette says that the sheets are to be used with your ink-jet printer, it means it.  I was actually not using my home printer, and was using a fancy laser-printer, which is not as easy to use with these foil sheets.  Thus, Silhouette telling you to use an ink-jet printer.  But I'm getting ahead of myself.

My first real mistake was to not change the settings on the printer.  I had it printing as if it were printing on a regular sheet of computer paper.  But for a laser printer, I needed to change the settings to print for "glossy paper".  I didn't realize that until my first sheet came out with the images shifted and smeared.  I quickly found out that mistake and sent it through a second time.  Unfortunately, one of the problems with a laser printer for this type of paper is how it puts ink on the paper, and as my second sheet went through, the printer still deposited some of the displaced ink from the previous print job onto this sheet.  You can see the comparison between the two sheets below:

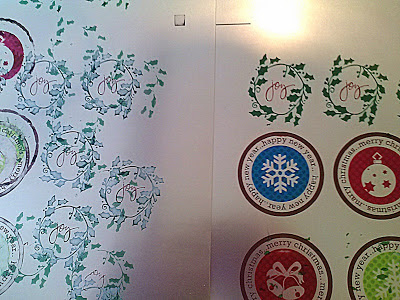
The second sheet (on the right) is much better because I used better printer settings, but still had a residue of the ink from the previous print due to using a laser printer.

In the end, because I did not have the best type of printer for the foil at the house where I was, I decided to also print some of the stickers on our printable white adhesive sticker paper.  When the cards went out, I used some of both sticker types I'd printed, since I thought both turned out cute.  Of course, it takes me forever to write that many Christmas cards, so I had a few stickers made that were perhaps a bit more appropriate to the timing of when I expected the cards to be sent out...


Here's to another happy year of crafting and learning!  I love this stuff. :)

Tuesday, November 13, 2012

DIY Photo Pendants

These are very beautiful handmade photo pendants by Ginger Snap Crafts.  All craft materials were picked up at an Etsy store. Have fun!


Check out the step by step directions to create your own photo pendant here http://www.gingersnapcrafts.com/2012/01/tutorial-photo-pendants.html

DIY Fall Framed Letter Project


This digital scrap booking project of Fall framed letters courtesy of Happy to Create, looks great and not hard to do!  Check out the link below for step by step directions.

http://happytocreate.com/printable-hybrid/hybrid-craft-framed-autumn-word-art/

DIY of The Day


 Here's a fun Thanksgiving craft idea using some empty bottles a Silhouette Craft Cutter and some other fun assortments!


This step by step project and photos are courtesy of
Choose To Thrive.
http://choosetothrive.blogspot.com/2010/11/in-every-thing-give.html

Tuesday, October 23, 2012

Cheese Party: Simple Table Cards


So, it turns out that I have a great love of cheese.  This, naturally, led to my desiring to throw a "fine cheese" party in an attempt to get to try all sorts of delicious new cheeses and have a fun evening with friends.  We decided to make it a mock "black-tie" affair, and have everyone dress up.  The rules were simple:  dress-up, bring a fun new cheese you've never tried, and come ready for fun!  My part was to provide the crackers and bread, sparkling cider & grape juice, and my apartment as the venue.  I did white lights in the trees, candles, fall leaves, and decided some cute table-cards for people to write the name of their cheeses on would be just the touch.  
Unfortunately, my busy schedule left me with only the day of the party to get ready, and I spent so much time cleaning and shopping for supplies that I left hardly any time to make the cards!  No problem.  Having my Cricut made whipping out some simple, cute table-cards in a matter of minutes easy.  I just flipped through the booklet of one of my favorite cartridges, Wall Decor and More, knowing it wouldn't let me down, and found just the right image.
Take a blank card and write down what cheese offering you've brought to share. :) 

Within minutes I had about 30 table-cards on the table, ready to go. At one point during the evening I had a guest marveling and asking me if I had cut out each of these designs by hand, wondering how I did it, and commenting just how long it must have taken.  :)  I just smiled and said, "Of course!" and that it took me about 5-10 minutes. ;)

Bon apetite!  

(Hint: For a little variety, I used the punched out fleur from the plate as a flourish for smaller cards, which I also put out.  It was like getting two cards made for every one cut! I like that.

Tuesday, October 16, 2012

Halloween Closet Sign/Decoration


Remember all those times as a kid when you were afraid of something hiding underneath the bed, or inside your closet?  (Maybe you read Dr. Seuss'  book, There's a Wocket in My Pocket and, like me, felt a little better about it after being able to put a name to the "woset" in your closet.) Well, that is what inspired my idea for this simple, but fun Halloween closet decoration.  

Hang this sign on the closet door in your child's bedroom... ;)  Or on the door of any other closet in the house.

I had this sign in mind and went to a few craft stores to find just the right "base" for my sign.  Unfortunately, they didn't have anything I was looking for for under thirty dollars, so I decided to try the thrift store.  That's where I found my sign.
This old serving platter, found at the thrift store for $3, proved to be a lovely board for my sign.
All I needed now was to paint over the sweet floral center of the platter, antique around the edges with some black paint, and then choose my fonts.

I found what I was looking for in the Lyrical Letters cartridge, where I used the Jack Sprat and regular main fonts.  I also used one font from Plantin SchoolBook for my "HIDE" because I wanted something a little wider.

Now, a word to the wise.  Hint: It is smart to always try and test your fonts and images on regular paper first to be sure that you get them the size that you want.  The "Real Size" dial makes every letter the exact same size as you have set on your sizing dial, but that isn't always what you want.  So doing a test run of your actual lettering and images on a plain sheet of computer paper is a much safer (and cheaper!) way to go.  It will save you from making the mistake I made...

I cut out the lettering on my vinyl before checking first on scrap paper to see if it would actually fit at that size....turns out that it didn't.  It is always safer to check on scrap paper first to be sure you are getting just what you want at a size that fits.

I used the gray vinyl, though that is hard to see in the final picture due to my camera and the lighting.  Once I had the lettering cut, I peeled the remaining vinyl off and then used transfer tape to apply the letters to the board.

Pulling away extra vinyl to reveal the cut letters so that I can apply the transfer tape.
When pulling away vinyl from many letters, such as in this project, I like to cut the excess vinyl away as I go, so as to avoid its sticky back grabbing onto any of the lettering if I get sloppy and let some of it fall back down. 

I wanted a colorful arrow to be pointing down, so I just used scrapbook paper I had on hand, and some Mod Podge to attach it.  (Again, the lighting kills the color.)  Finally, I just attached a nice black ribbon to the back to hold it in place. 

And then, presto!  Cute new Halloween decoration, good for any closet door.  If you leave the door open a crack, it might even make it a little more spooky. :)  Now, all I need are a few fake monster hands to have coming out from behind the door... 

Happy haunting!

Tuesday, October 9, 2012

Whooo made that pumpkin with the Vinyl Owl?


Don't get me wrong, I love carving pumpkins as much as the next 5 year old ;) , but sometimes when you have a bit of warm weather, the carved ones seem to "go" (aka, rot) much quicker than I'd like. This year, I decided to try making a few cute pumpkins with vinyl designs to decorate my house or porch.


I knew my Cricut would do the job just great, and that I had some cartridges that would give me just what I wanted.  Wall Decor and More had this delightful owl, and Plaintin SchoolBook's Tall Ball font gave me just the look I wanted for my owl's hooting "whoooo"'s. :)

First, I tested out the sizing of the owl on a piece of computer paper to be sure that I got it to a size that fit my pumpkin just perfectly.

Use a piece of computer paper to test the size and be sure it fits your space.  It's a much cheaper than using your vinyl to test this out.

Next, I used black vinyl to cut out my lettering and shapes.  Then I used transfer tape to apply my letters and the owl to the different squash.  (Did I mention that the smaller of the two is actually an acorn squash?  It was the only pumpkin-esque squash I could find that was smaller than my pie pumpkin. I plan to make double use out of these guys...)


Simple as that, I made myself some cute Halloween pumpkins (squash)!  These guys will stay up until I get an itching to make pumpkin pie, or to try out this tasty looking acorn squash recipe!  (So...maybe they'll only stay up a few days. Or maybe I'll just have to go buy another squash. :) It just sounds so good! )


Helful Hint:  Attaching vinyl images to a curved surface can prove tricky.  I learned that with this project, after the fact.  Maybe cutting a few little "give" slits, like in sewing, might prove helpful in getting the image to curve better with your curvy surface.  Just a thought.